 For 3ds Max Design software users who are new to the world of rendering, there are several options to choose from. At first glance in using the software you have to choose what “type” of rendering process you are going to use… the default Scanline renderer or mental ray which many folks refer to as “bucket rendering”. It is known as bucker rendering because the computer processor or multiple processors work on renderings one square area at a time, verses the scanline rendering which is a pixel row, starting from the top one row at a time.
 The image below shows the rendering in progress. 3ds Max Design will render a low level quality pass over the scene, which looks pixelated or like mosaic tiles. This is to help you determine the camera shot, angle, and if the scene is the correct one. This quick pass allows you to cancel the rendering, and not have to wait several minutes for a non-desired rendering.
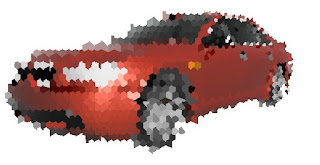
The next image shows additional progress on the rendering. The front of the car is complete, and the black box by the front fender is the processor working on refining that area. If you have a multi-core processor computer, you will see several boxes jumping around the scene working to refine the areas.

And if you are wondering, the image at the top took 35 seconds to render. It would of taken double that with scanline and the quality wouldnt of been as nice. Overall mental ray rendering will give you more realistic renderings, with faster results. It is the preferred industry standard/method of rendering. But, you can switch between scanline or mental ray. Either choice can be set in the Custom UI and Default Switcher in 3ds Max Design. A restart of 3ds Max Design will be required.
But that is just the first of many choices for rendering methods. Check back for future entries on renderings and 3ds Max Design. Until then... Happy modeling and rendering!
awesome website blog keep it up the good work
ReplyDeleteRamzan Mubarak Images