Friday, December 23, 2011

a la carte rendering

For 3ds Max Design software users who are new to the world of rendering, there are several options to choose from. At first glance in using the software you have to choose what “type” of rendering process you are going to use… the default Scanline renderer or mental ray which many folks refer to as “bucket rendering”. It is known as bucker rendering because the computer processor or multiple processors work on renderings one square area at a time, verses the scanline rendering which is a pixel row, starting from the top one row at a time.
The image below shows the rendering in progress. 3ds Max Design will render a low level quality pass over the scene, which looks pixelated or like mosaic tiles. This is to help you determine the camera shot, angle, and if the scene is the correct one. This quick pass allows you to cancel the rendering, and not have to wait several minutes for a non-desired rendering.
The next image shows additional progress on the rendering. The front of the car is complete, and the black box by the front fender is the processor working on refining that area. If you have a multi-core processor computer, you will see several boxes jumping around the scene working to refine the areas.
And if you are wondering, the image at the top took 35 seconds to render. It would of taken double that with scanline and the quality wouldnt of been as nice. Overall mental ray rendering will give you more realistic renderings, with faster results. It is the preferred industry standard/method of rendering. But, you can switch between scanline or mental ray. Either choice can be set in the Custom UI and Default Switcher in 3ds Max Design. A restart of 3ds Max Design will be required.
But that is just the first of many choices for rendering methods. Check back for future entries on renderings and 3ds Max Design. Until then... Happy modeling and rendering!

Tuesday, December 13, 2011

Color Display of Worksharing


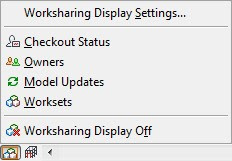
The “Worksharing Display Settings” is a tool to help you display a view in your model based on Worksharing status. This is a relatively unnoticed addition to Revit in 2012. The tools can be accessed in the View display tools in the bottom left corner of a view after a project has been Workshared. See Image above for example.


This tool is a way to color display some critical information about the current view related to Worksharing. There are four settings: Checkout Status, Owners, Model Updates and Worksets. The Colors can be changed for each topic for a more desirable look. See image below for example.

Tuesday, November 22, 2011

Applied Software Blog

I'll be contributing blog entries to Applied Software's Blog...
Covering information, news, techniques and critiques from Applied Software's technical and sales team.

Tuesday, October 25, 2011

Micro Application Packages Limited (MAP Software)

Autodesk Acquires Micro Application Packages Limited. This acquisition Helps Extend Building Information Modeling Across the Building Lifecycle Beyond Design to Support MEP in the BIM environment.

Link to article: http://www.marketwatch.com/story/autodesk-acquires-micro-application-packages-limited-2011-10-20

Monday, October 24, 2011

Autodesk AREA App

Autodesk's AREA has a new app for Droid and Apple devices.

This mobile device collects resources for news, information, tutorials specifically for TV and film industry.

Here is the link below:

http://area.autodesk.com/forum/autodesk-area-mobile/general-discussion/download-the-area-mobile-app/

Monday, October 10, 2011

In Canvas

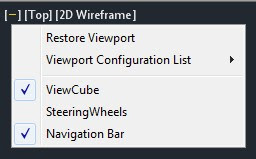
In Canvas is a viewport control for View, Viewport, and Visual Styles. If you have used 3ds Max before, this feature will look familiar. It has been in 3ds Max for several releases. But will be very helpful in AutoCAD to have the same kind of functionality.
Located in the upper left corner of each viewport, this is a quick access tool to change settings within the viewport. See image above.

Tuesday, September 20, 2011

Project Folder

Project folders in 3ds Max are a great helpful tool! By setting the project folder, this allows 3ds Max to search or look in the folder of that project directory. This works well for when other people are working on a project with you or if you have to come back to a project after a few weeks. Setting the project active re-paths the search folders in 3ds Max to look for presets, scenes, import/export and other project specific folders.
Found under the Application big "M", and then Manage setting the folder is easy either to an existing folder or creating a new one.

Friday, September 16, 2011

Content Explorer

Have you checked out the Content Explorer in AutoCAD and AutoCAD Architecture (ACA). It is pretty cool. It can be accessed from the Plug-ins Tab in AutoCAD or the Add-ins tab in ACA, both look like binoculars.
With Content Explorer you can catalog content for speedy access, index the objects in each file, and search for content in local drives, network locations, and the Autodesk Seek.
Click on the side image for a better look.

Tuesday, July 5, 2011

3ds Max Design - Stripe Material

I had a client ask about making a custom stripe material. Like for a roof canopy.

The easiest way is to do this is in in Photoshop I made a material. 2'x2' image size, with 1' red stripe and 1' white stripe vertical. And saved it as a JPG.

To apply it, copy that to your desktop or project folder. Drag into an open slot in Mat. Browser. Name it Stripes. Change tiling to 2'x2'. Drag material onto your object. Should be good to go. You may have to apply it to sub-object or rotate it depending on your specific object.

See example image above.

Tuesday, June 21, 2011

Revit - Move vs. Copy

During a Copy command, hold down the “ctrl” key to turn the move into a Copy.

Saturday, June 18, 2011

Revit Architecture - RCP

If you don’t want a level to have a ceiling plan, right click on it in the Project Browser and select delete.

Tuesday, March 29, 2011

Autodesk 2012 shipping


Autodesk announced it wil lbe shipping 2012 products soon. AutoCAD and AutoCAD Architecture actually shipped on March 24th. Here is a link to Autodesk's website for more information on AutoCAD 2012. There are a lot of cool new features: http://usa.autodesk.com/autocad/features/

Friday, January 28, 2011

Revit - Roombook

A new subscription extension for Revit Architecture, Roombook calculates surfaces of walls, floors and ceilings as well as room circumference. If you have a need to do quantity takeoffs or need SQFT information on room surfaces, this tool is great! You have to be a Subscription memeber to get this add on. On the downlaod site, there is a helpful PDF explaining this feature in more detail.

Thursday, January 20, 2011

3ds Max Design - Race Car Rendering


I havent updated this blog in a few days, but its because I have spent the last few days refining my modeling, lighting and material skills in 3ds Max. I focused on a race car for Modified racing. I learned a lot about creating materials, pelting, UVW unwrapping. And adjusting, creating lighting, self illumination materials and shadow settings. Below are the images of the end results.


Monday, January 3, 2011

New Year!


Its a new year and I am looking froward to sharing new blog information. Last year after starting blogging in July, I managed to post 95 blogs. That averages a post almost every working day of the week. Im planning to do the same this year. New and great things planned for this year! Stay tuned!
Note: I found this cool "2011 flaming" image at miglo.net