Thoughts on Autodesk software... Revit, 3ds Max, AutoCAD, AutoCAD Architecture, Navisworks and the architecture industry.
Friday, December 24, 2010
Friday, December 17, 2010
Revit - Surface pattern
 A question came up recently about how to remove the surface pattern from a slab when viewing it from a plan view.
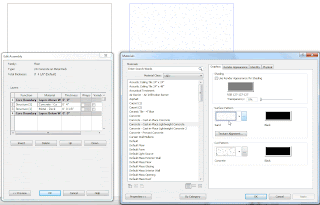
First off, find out what the material is on the slab that is being displayed. Select the slab, go to "Edit Type" in the Properties. Under Structure row, pick the Edit button. Find the top material. Lets say concrete for our example. Pick on it and select the "..." button. This will open up the Materials. The select material should be pre-highlighted. Select it and go to the Surface Pattern area on the right. Change the material to . Select OK three times and you will be back to your view, which is now updated to not show the surface material.
Note: This will remove the surface pattern for all of the slabs with that same material. There are some other options to duplicate the slab type and material, if you want slab "A" to show surface material, and slab "B" not to show the surface material.
Wednesday, December 15, 2010
3ds Max Design
3ds Max Design can be like a "black box". But with a little understanding of the software, it can produce some very realistic images of your model. A question that may come up is whether to use Scanline or Mental Ray rendering. It may seem an odd question at the beginning of a project, but we need to start with the end in mind. Several of the materials, lighting and environment can be effected by which rendering engine is chosen.
Scanline has been around for several years and was the default rendering engine in 3ds Max. But Mental Ray, which is a contracted third party application for rendering that comes with the software, can tie together the materials, lighting and environment to adjust colors, and brightness for rendering. Many existing users of Max still use the Scanline because they are not that familiar with Mental Ray, but give it a try, see what results you can get. You may be pleasantly surprised!
Scanline has been around for several years and was the default rendering engine in 3ds Max. But Mental Ray, which is a contracted third party application for rendering that comes with the software, can tie together the materials, lighting and environment to adjust colors, and brightness for rendering. Many existing users of Max still use the Scanline because they are not that familiar with Mental Ray, but give it a try, see what results you can get. You may be pleasantly surprised!
Friday, December 10, 2010
Revit Server
 Revit Server is available thru Autodesk Subscription. It allows multiple users in seperate offices to access the same file. This is different than traditional Worksets. There are some specific requirements to have inplace forthis to work. IIS7, Windows Server 2008 (not r2), and this only works presently within your WAN.
This is a good link to Autodesk's website regarding Revit Server, and it has a few videos as well: http://usa.autodesk.com/adsk/servlet/ps/dl/item?linkID=9243099&id=15731389&siteID=123112
Thursday, December 9, 2010
Backburner
 Backburner is a batch network rendering utility that comes with 3ds Max and Maya. This is used when you want to render multiple images to several computers/nodes.
It has 3 main pieces. Manager, Monitor and Server. The Manager and Monitor are usually installed on the same computer. This is typically your computer that is running 3ds Max, but does not have to be. Some companies have a dedicated Graphics computer that would work well to have this installed on. Also the Server piece needs to be install on the computer nodes. The name Server is a bit misleading, because it infact gets installed on the workstation. A true network server doesn't really have a part in all of this. Also, 3ds Max needs to be installed on the computers with the Server piece. 3ds Max is needed to process the information. It does not need to be registered or licensed. You can install up to 9,999 installations of 3ds Max for the Rendering farm.
So the concept is that you have a 3ds Max model and want to render several shots or an animation. Go thru your regular process in Max that you would normally do to render, but at the end use the Batch Rendering to load your renderings and animations. Then select the checkbox "Net render" button in the lower left and then the "render" button to send the images to be processed. The Manager and Monitor will take over from there. They will pass on the images to the Server nodes for processing.
Here is a great link to Autodesk's website with two videos on Backburner: http://usa.autodesk.com/adsk/servlet/ps/dl/item?siteID=123112&id=14338791&linkID=10381719
Wednesday, December 8, 2010
AutoCAD - Scaling
 No its not a Mitsubishi car symbol. Its an icon of the cross section of a an architectural scale. The actual tool is for Annotative scaling of annotation objects like text, dimensions and graphical symbols. This feature was added a few releases ago, but I realized from teaching, that there are a lot of folks who are still working in Model Space, doing things the old way, and aren't aware of Annotative scaling.
By using the annotative scaling, it takes care of all the busy work of text sizes when changing scale. The quick, down and dirty of making it work, is to have all of these buttons turned on. They will lit up and showing the light bulb and lightening bolt in yellow once on. Also you need to be using Annotative text or dimensions. Set your scale and start drawing. The text and dims will display at the correct height per your settings and when you change the scale they will update. I last cool thing is that the text will scale according to the Viewport scale. Annotative scale rocks! Enjoy!!
Tuesday, December 7, 2010
AutoCAD - Get a grip!
 Using grips in AutoCAD can be a useful way of editing your objects. Whether you are moving an object or lengthening a line, grips can be faster than finding the traditional tools for editing.
When the grips are "blue" they are cold or not selected. When you select the grips, they turn red, or whats called "hot", which means they are active and ready for action.
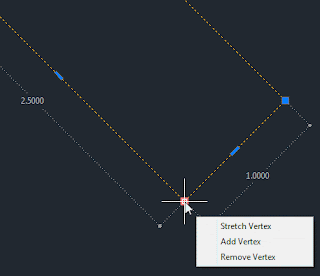
In recent releases of AutoCAD, more features have been added to grip selection. For example, on a polyline, we can now edit Vertices. Which includes: adding, removing or stretching.
Monday, December 6, 2010
AutoCAD
 I've been using AutoCAD since Release 11, when it was DOS based. A lot has changed since then, and for the better! I enjoy finding new tips, tricks and little things to help make life easier.
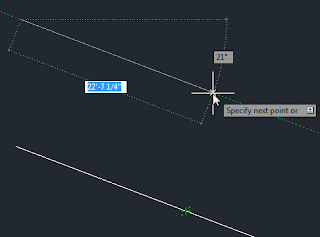
Here is something simple but worth it. Osnap - Parallel. This Osnap allows you to draw a new line or object parallel to a reference object. You start the line command, and then using the Parallel Osnap hover over the reference line. You will see a symbol looking like this "//" over the line. It will disapear as you move off, but once you are lined up parallel with the reference line and your new line, the symbol will reappear and you can draw your line parallel. Simple but effective! Enjoy!
Thursday, December 2, 2010
Autodesk Project Photofly
 I recently was a lab assistant at Autodesk University for a unique class. Project Photofly from Autodesk Labs. It is a software that allows you to take digital photos of your project (inside or outside) and the application will stich them together to create a 3d model point cloud. You can then go into the model and set measurements and X,Y,Z orientation reference points. Once done refining the model you can export it out to DWG, FBX and a couple other file formats. This app. is currently in Autodesk Labs, which means it is still being refined, but you can check it out and see what you think. Here is a link to the site:
Wednesday, December 1, 2010
Autodesk University 2010
 Its that time of year again for Autodesk University in Las Vegas. AU as its known is a worldwide conference that covers a week worth of learning, networking and finding out about new technologies. I am teaching a Revit Structure class this year which should be fun. It covers the Truss feature in Revit Structure.
Here is a link to the main AU website: http://au.autodesk.com/
Subscribe to:
Comments (Atom)
