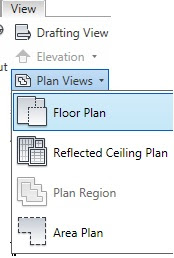
 Continuing from the previous blog about dead levels, we can make dead levels into live levels. This is done by going to the “View” tab, “Create” panel, “Plan View” dropdown, and selecting the “Floor Plans” tool. A dialog box will appear to match up a dead live with the new floor plan. This will create a floor plan for the dead level, making it live. The new level will show up in the Project Browser.
Thoughts on Autodesk software... Revit, 3ds Max, AutoCAD, AutoCAD Architecture, Navisworks and the architecture industry.
Monday, November 29, 2010
Revit Levels – Made Live
 Continuing from the previous blog about dead levels, we can make dead levels into live levels. This is done by going to the “View” tab, “Create” panel, “Plan View” dropdown, and selecting the “Floor Plans” tool. A dialog box will appear to match up a dead live with the new floor plan. This will create a floor plan for the dead level, making it live. The new level will show up in the Project Browser.
Friday, November 26, 2010
Revit Levels – Dead vs. Live
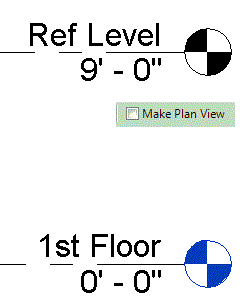
For Levels, we can create levels with floor plan views. Or we can create levels that do not have floor plans associated with them. These are usually used when you want to constrain or lock elements to the “dead” level, but do not need the floor plan. This could be a B.O. Steel level, or some other level for coordination. Live levels are shown with blue datum, while dead levels are shown as black datums.
Wednesday, November 24, 2010
Revit – Measuring
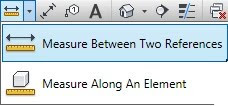 There are times when you need to measure objects. There are two different ways to do this in Revit. The first is “Measure between Two References” and “Measure Along An Element”. For the first, select the two references, and a temporary dimension will display the measurement. For the second option, select the element and then click to measure along the element tool. You can use the “Tab” key to select other elements.
Tuesday, November 23, 2010
Revit
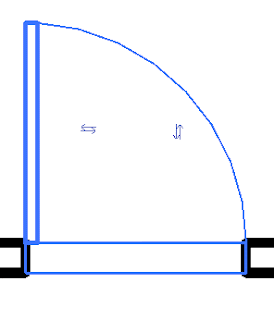 Couple of quick tips for Revit when adding doors.
- Type "SM" to place doors at the midpoint of wall segments.
- Click on the "space bar" to flip the swing direction before final placement.
- After placement, use the flip arrows to adjust the direction and swing. See image to the right.
These same tips work for windows as well.
Monday, November 22, 2010
Navigating in Revit
When finding your way around a Revit project, it is important to do it efficiently, so you are not stuck in a corner or zoomed far out of your project. For quick zooming, hold down the Shift key with your middle mouse button. For panning, hold down the middle mouse button. If you like keyboard shortcuts, here are a few helpful ones:
ZR Zoom Region
ZO Zoom Out
ZA Zoom All
ZS Zoom Sheet
ZP Previous Pan/Zoom
ZR Zoom Region
ZO Zoom Out
ZA Zoom All
ZS Zoom Sheet
ZP Previous Pan/Zoom
Monday, November 8, 2010
TREX - Trim Extend
TREX - Trim Extend. In AutoCAD Express Tools, there was added a command named TREX. Commandline: TREX... Pick to trim or Shift+Pick to extend [Project/Edge/Undo]:
It was a combination of Trim and Extend by holding down the Shift key. That functionality is now part of base AutoCAD. Now you dont need Express Tools to have this option. Its included. Either in Trim or Extend you can use the Shift key to toggle between the two commands. I suggest using the "Select All" option for cutting edge at the beginning to give you the most functionality.
It was a combination of Trim and Extend by holding down the Shift key. That functionality is now part of base AutoCAD. Now you dont need Express Tools to have this option. Its included. Either in Trim or Extend you can use the Shift key to toggle between the two commands. I suggest using the "Select All" option for cutting edge at the beginning to give you the most functionality.
BATTMAN
 BATTMAN - Block Attribute Manager. From Autodesk Help... You can edit the attribute definitions in blocks, remove attributes from blocks, and change the order in which you are prompted for attribute values when inserting a block.
Attributes of the selected block are displayed in the attribute list. By default, Tag, Prompt, Default, Mode, and Annotative attribute properties are displayed in the attribute list. You can specify which attribute properties you want displayed in the list by choosing Settings.
For each selected block, a description below the attribute list identifies the number of its instances in the current drawing and in the current layout.
Thursday, November 4, 2010
Inventor - Tutorials
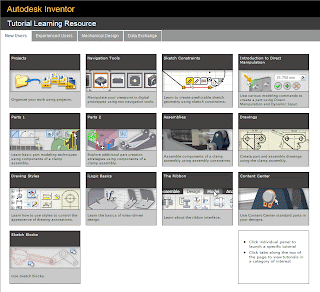 For a "newbie" of Inventor I need all the hlep I can get. So I am glad to see a wealth of information on training in the form of Tutorials. This image to the side show some of the areas covered in the tutorials. From starting a project, navigation, assemblies all the way thru an entire project. I found some helpful content on Autodesk website in the Inventor section on learning resources as well. Cant wait to dive in!
Inventor - Getting Started
 After waiting what seemed like forever to download Inventor, I was ready to install the application. That went smoothly and now Im ready to start learning some new stuff. First off I felt somewhat comfortable with the application because of the Ribbon configuration. The first tab is a "Getting Started" tab with a dozen or so panels with items to help to get you off the ground. These look very informative, covering Ribbon intorduction, What's New, Tutorials and other helpful items. Be sure to take a look at them. Above is a screengrab to see what is listed.
Autodesk Inventor
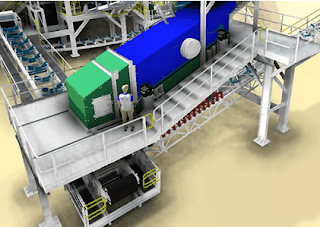 I usually work with Revit or 3ds Max, but recently have been interested in Inventor. For those of you familiar with Revit and BIM, the Inventor product is the parameteric modeling tool for Manufacturing.
Link to Autodesk's Inventor: http://usa.autodesk.com/adsk/servlet/pc/index?siteID=123112&id=13717655
Subscribe to:
Posts (Atom)